Blog
How to DIY a LiFePO4 Battery Pack

Building your own LiFePO4 battery pack can be an exciting and rewarding project. Before you dive into the assembly process, it's essential to understand why LiFePO4 batteries are suitable for DIY projects. This guide will walk you through the necessary materials, tools, processes, and answer common questions to help you successfully create your own battery pack.
Understanding LiFePO4 Batteries
Before starting your project, it's important to know the advantages of LiFePO4 batteries. They are known for their high safety, long cycle life (typically around 2000 charge cycles), and excellent thermal stability. Compared to other lithium batteries, LiFePO4 has a lower risk of thermal runaway, making them ideal for various applications such as renewable energy storage, electric vehicles, and portable power supplies.
Materials Needed
- Battery Cells
- Choose LiFePO4 battery cells that fit your energy requirements, ensuring the capacity and voltage match your design.
- Battery Management System (BMS)
- A BMS is crucial for ensuring the safety and performance of your battery pack. It monitors each cell's voltage, prevents overcharging and over-discharging, and provides balancing features.
- Wiring and Connectors
- Use high-quality copper wires and connectors to minimize resistance and ensure stable connections.
- Enclosure Options
- Your battery pack will need a protective enclosure to prevent physical damage and short circuits. Plastic boxes or metal housings can be used, ensuring adequate ventilation.
Required Tools
- Soldering Iron
- A soldering iron is essential for making secure electrical connections.
- Wire Cutters/Strippers
- These tools are needed to prepare wires for connections, ensuring clean and safe contact points.
- Multimeter
- A multimeter is used to measure voltage and check the functionality of the assembled battery pack.
- Heat Shrink Tubing or Electrical Tape
- These materials are important for insulation and protection of connections, preventing short circuits.
Design Considerations
When designing your battery pack, you need to consider series and parallel configurations:
Series: Connecting battery cells to increase voltage.
Parallel: Connecting battery cells to increase capacity.
Make sure to calculate the size and configuration of your battery pack based on your energy needs and space constraints.
Assembly Process
Prepare the Cells
- Before connecting, ensure all cells have the same voltage. This step is crucial for balanced performance.
- Check each cell for any signs of damage or swelling. If any cell appears damaged, do not use it.
Connect the Cells
Decide on your configuration:
Series: Connect the positive terminal of one cell to the negative terminal of the next to increase voltage.
Parallel: Connect all positive terminals together and all negative terminals together to increase capacity.
Ensure the connections are tight to avoid any loose contacts.
Solder Connections
- Use a soldering tool to secure the connections between the cells and wires.
- Evenly heat the connection point, then apply solder to allow it to flow smoothly, forming a solid joint.
- Avoid overheating the cells, as this can cause damage.
Integrate the BMS
- Carefully follow the instructions provided with the Battery Management System (BMS) to connect it to each cell.
- Ensure each cell is connected to the BMS according to the specified configuration (series or parallel).
- Double-check all connections for accuracy and reliability.
Install the Cells in the Battery Pack Enclosure
- Carefully place the connected cells and BMS into the chosen enclosure, ensuring there is enough space inside.
- Ensure the battery pack is securely fixed in the enclosure to prevent movement or impact during use.
- Use appropriate insulating materials to ensure there is no risk of short circuits between the battery pack and the enclosure.
Solder Terminals to the Battery Pack Enclosure
- Use a soldering tool to solder the positive and negative terminals to the corresponding positions on the battery pack enclosure, ensuring a secure connection.
- Ensure that the terminals are not overheated during soldering to prevent damage to the cells or enclosure.
- After soldering, check the stability and safety of the connection between the terminals and the battery pack.
Safety measure
Wear gloves and safety goggles when handling lithium batteries to ensure safety.
Ensure good ventilation and keep flammable materials away during assembly and use.
Testing and Validation
Initial Testing
After assembly, the first step is to use a multimeter to test the voltage of the battery pack. This step is crucial to ensure that each battery cell's voltage is within the expected range. Typically, LiFePO4 battery cells should have a voltage between 3.2V and 3.6V. Here are some detailed steps:
- Check Voltage: Set the multimeter to measure DC voltage. Measure the voltage of each cell in the battery pack, ensuring all cells are within the normal range.
- Record Data: Document the voltage of each cell for future comparison and monitoring. If any cell shows abnormal voltage, inspect its connections and condition immediately.
Load Testing
Load testing is an essential step to verify the performance of the battery pack. It ensures that the battery pack can operate normally under actual usage conditions. Here are detailed steps for conducting a load test:
- Prepare Load: Choose an appropriate load, such as a resistor or load bank, that can simulate the current requirements of real-world applications. Ensure the load's power rating does not exceed that of the battery pack.
- Connect Load: Securely connect the load to the positive and negative terminals of the battery pack. Ensure that the connections are tight to avoid any looseness during testing.
- Monitor Voltage and Current:
Use a multimeter or ammeter to monitor the voltage and current of the battery pack under load. Record this data to compare with readings taken without load.
Pay attention to whether the battery pack's voltage remains stable or shows significant drops. A marked voltage drop may indicate an issue with one or more battery cells. - Test Duration: Conduct the load test for a specific duration (e.g., 30 minutes or 1 hour) while observing the performance of the battery pack during continuous discharge. Check for overheating or any other abnormalities.
- Evaluate Performance:
Assess the performance of the battery pack based on the test data, including discharge time, capacity, and stability. If the battery pack performs well under load and the voltage remains within acceptable ranges, it can be considered to have passed the load test.
If issues are identified, check the connections of the battery cells, the settings of the BMS, and inspect for any damaged cells.
Through these tests, you can confirm the safety and performance of your battery pack, ensuring its reliability in practical applications.
Maintenance and Monitoring
Regular Checks
Regularly checking the voltage and temperature of the battery pack is crucial to ensure its proper functioning. Here are some specific checking recommendations
- Voltage Monitoring: Use a multimeter to regularly measure the voltage of each battery cell, ensuring they are within the normal range (typically between 3.2V and 3.6V). Uneven voltages can lead to reduced performance or shortened battery life.
- Temperature Monitoring: Regularly check the temperature of the battery pack, especially during high load or high-temperature conditions. The ideal operating temperature is usually between 20°C and 40°C; extreme temperatures can impact battery performance and safety.
- Visual Inspection: Regularly inspect the battery cells for any physical damage, swelling, or signs of leakage. If any abnormalities are detected, stop using the pack immediately and replace any damaged cells.
Troubleshooting Common Issues
- Voltage Discrepancies: If you notice voltage differences among the battery cells, first check all connections to ensure they are tight and free of corrosion. Then, use the balancing feature of the BMS to adjust the voltage levels of the cells, ensuring they are at the same level.
- Battery Pack Not Charging or Discharging: If the battery pack cannot charge or discharge properly, check if the charger is functioning correctly and confirm that the BMS is not faulty. Make sure the battery pack hasn't been over-discharged; if the voltage drops too low, you may need to use a specialized charger to restore it.
- Temperature Abnormalities: If the battery pack's temperature is too high, it may be due to overload, short circuit, or inadequate cooling. Stop using it immediately and inspect the battery cells and connections to ensure there are no faults.
- Reduced Run Time: If you notice a significant decrease in the runtime of the battery pack, it could be a sign of aging or damaged cells. Regularly replace aging battery cells to maintain optimal performance.
By conducting regular maintenance and monitoring, you can ensure the safety and performance of your LiFePO4 battery pack, extend its lifespan, and avoid potential issues.
Common Questions and Answers
- How long do LiFePO4 batteries last?
- LiFePO4 batteries typically last around 2000 charge cycles.
- What should I do if a cell is damaged?
- Handle damaged cells carefully and replace them promptly.
- Can I use these batteries in extreme temperatures?
- LiFePO4 batteries perform well in temperatures ranging from -20°C to 60°C, but avoid prolonged exposure to extremes.
- How do I know if my battery pack is balanced?
- Use a multimeter to check the voltage of each cell and ensure they are within the same range.
- What is the best charging method for LiFePO4 batteries?
- Use a charger specifically designed for LiFePO4 batteries to ensure safety and longevity.
- Can I use LiFePO4 batteries to replace lead-acid batteries?
- Yes, LiFePO4 batteries typically offer higher energy density and longer life, but ensure voltage and capacity match.
Conclusion
By following the steps outlined above and considering all aspects, you can successfully build a reliable LiFePO4 battery pack. This project will not only meet your energy needs but also enhance your understanding of battery technology. Whether you're doing it for practical purposes or seeking a personal challenge, this DIY project will bring you a great sense of accomplishment. Enjoy the process and best of luck with your battery pack!
- Next:How to Charge LiFePO4 Batteries with Solar Energy
- Previous:How to Tell if Your Lithium Battery is Safe? 7 Warning Signs You Should Know
Contact Details
Lithium LiFePO4 Batteries and Lithium LiFePO4 Cells Supplier - LiFePO4 Battery Shop
Contact Person: Miss. Elena Wang
WhatsApp : +8615263269227
Skype : +8615263269227
WeChat : 15263269227
Email : info@lifepo4batteryshop.com
All Products
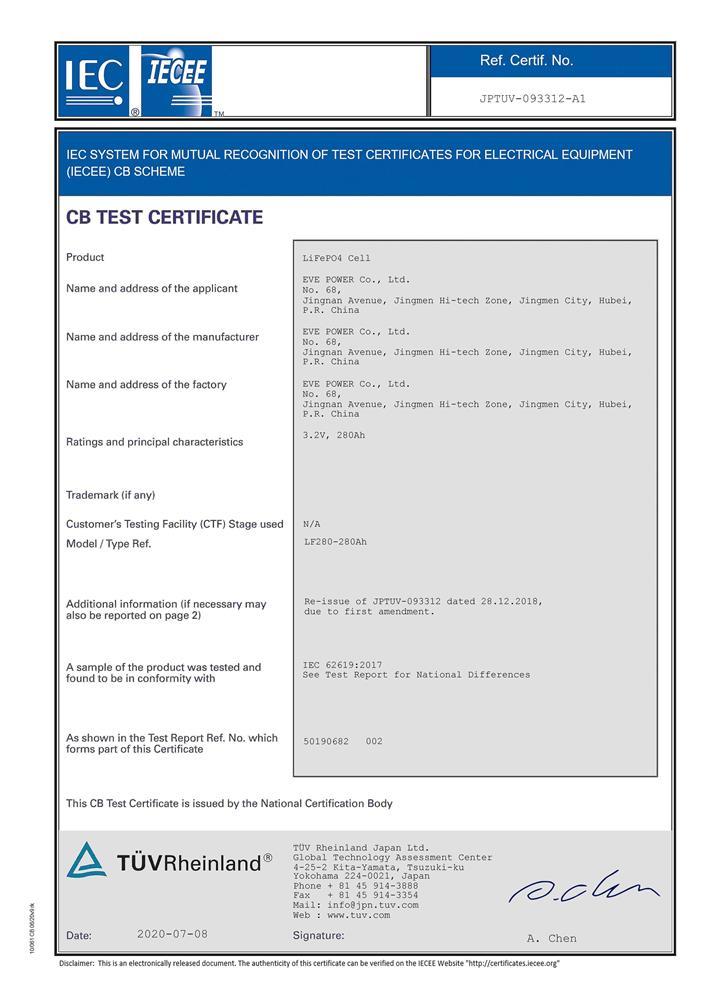
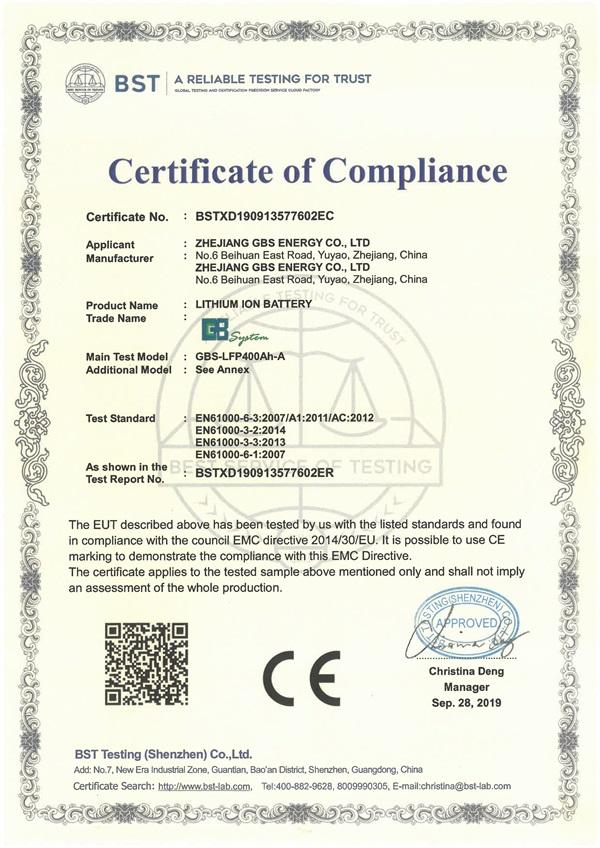
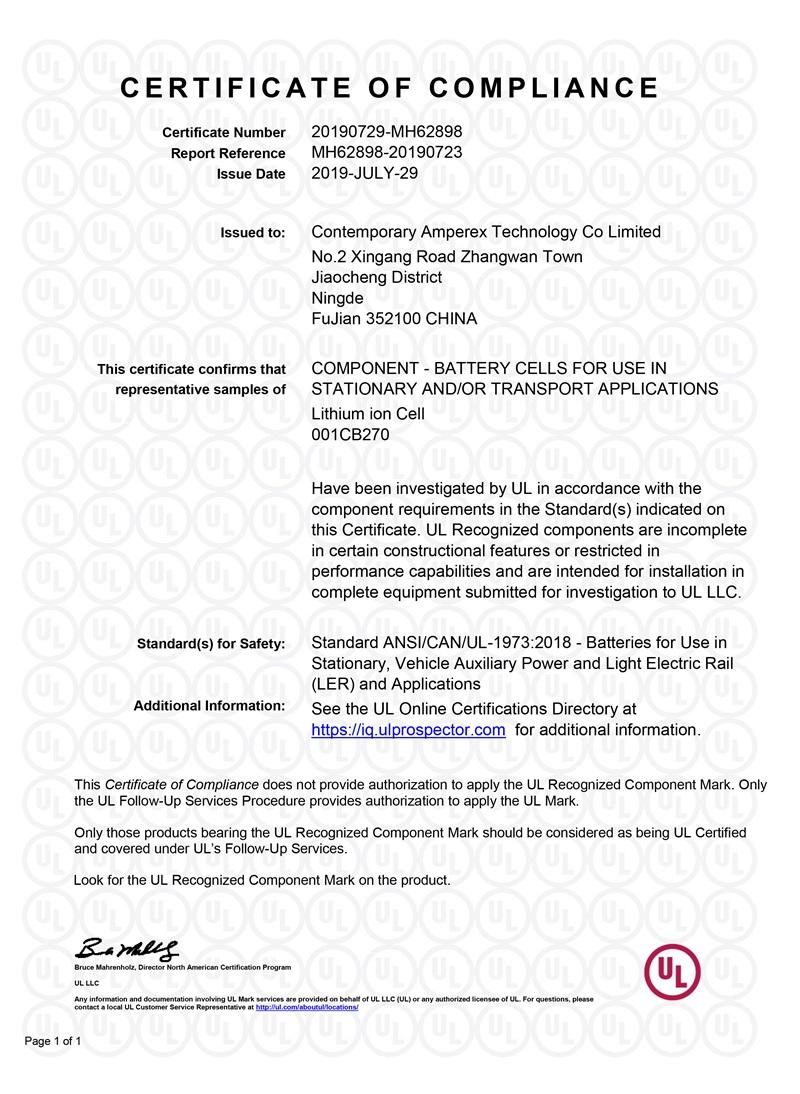
Certification
Customer Reviews
- I have fond memories of our meeting in Shanghai with LiFePO4 Battery Shop Elena. Your company left a strong impression on me with its impressive growth and professionalism. We both value straightforwardness and honesty, which I believe are the most important qualities in any partnership. I am confident that we can build a successful collaboration based on these shared values. —— Robert from USA
- I've been working with LiFePO4 Battery Shop for years, and their reliability is unmatched. While other suppliers frequently change sales teams, LiFePO4 Battery Shop has consistently provided exceptional service with a stable team. Their commitment to quality and customer support truly sets them apart. —— Henry from Australia